
I hope that anyone reading this has a lovely Christmas and a wonderful New Year!
love
Joey xxx
Thursday, 25 December 2008
Merry Christmas Everyone!
Thursday, 27 November 2008
Two Very Different films: Easy Virtue and Waltz With Bashir

It's taken me nearly a whole week to review these two films... whoops!
Easy Virtue
Adapted from the Noel Coward play of the same name, I expected an enjoyable comedy, and I wasn't too disappointed. The Whittaker family live in a large English country house of the 1920's. The son (Barnes) returns from his travels in the US with Larita, a blonde American racing-driver bombshell (Biel) and announces to his family that she's his new wife. The mother (Scott-Thomas) and two sisters are shocked at this American invasion, with Larita's shiny clothes, modern ideas and cigarette smoke, but the father (Firth) seems amused by this breath of American fresh air.
It's an entertaining story and I enjoyed the comedy moments but it seemed to try too hard to shoehorn a side-story about the father's involvement in the first world war and this just didn't work. Who wants to watch something heavy on a Friday night? I need a laugh to start off the weekend!
It would be interesting to see a performance of the play, and Hitchcock's silent 1928 version to see how the story has been interpreted by different people. It's worth a watch, but don't get too excited, it's just a bit of fun.
Official site: http://easyvirtuethemovie.co.uk/
Waltz With Bashir

Although I was at school in the early 80's when the Lebanon war was going on and I remember the regular news reports of the fighting and footage of the devastated city of Beirut on t.v., this arresting animated film showed me how little I actually know about it.
We find Ari in the present day, listening to an old friend from the Israeli army they served in together, discussing what they remembered about the war they both fought in. Ari is distressed to find that he cannot remember the same details which his friend does, so he goes on a journey to find out what his other comrades remembered, to examine his own memories and feelings about the war.
It's a surreal and disturbing journey and the stark, comic-book graphic style of the animation is well suited to the grim subject-matter. It works so well as an animation; the strange and horrific images are simplified and stylized to direct our attention. This is an engaging film and although it was a view from an Israeli perspective, this didn't obscure the power of the story it told.
Official site: http://waltzwithbashir.com/home.html
Friday, 24 October 2008
Fear(s) of the Dark
+du+noir.jpg) Fear(s) of the Dark is a magical mixture of dark dreams, dark thoughts and dark places. It's a collection of six French animated films about a little girl's horrific dream, a man who finds shelter from the snow in an abandoned house, a young man's first girlfriend and others. The darkness theme twisted and bound the six separate stories together very well and they complimented each other, although they were made by six different animators.
Fear(s) of the Dark is a magical mixture of dark dreams, dark thoughts and dark places. It's a collection of six French animated films about a little girl's horrific dream, a man who finds shelter from the snow in an abandoned house, a young man's first girlfriend and others. The darkness theme twisted and bound the six separate stories together very well and they complimented each other, although they were made by six different animators.
The animation itself wasn't great as they were all computer animated which tends to look quite clumsy, but the graphic monotone design of all the films was beautiful and there were plenty of bits to make you jump or make your skin crawl. This is a world of weird creatures, strange shadows and depraved lunatics.
 The film felt like a comic-book, from the visually arresting red and black title sequence, through a gritty, flickering pencilled world to stark black and white ink drawings.
This is a wonderfully chilling collection of films which will horrify you in a very delightful way.
Click for: Fear(s) of the Dark - official site
UK Trailer
Wednesday, 15 October 2008
Blog Action Day for Poverty: Jewellery from Junk

Photo by WE Centers Uganda
I enjoy sewing and selling my creations on Etsy. I feel lucky to have Etsy as an option so that I can make back a little money to help pay for the all the money I spend on craft supplies. I don't rely on it though, I have a 'proper' job to pay the bills. But what about women in Uganda, who live in poverty and don't have access to Etsy, let alone employment that will give them a decent wage. This is where organisations like Bead For Life and Life in Africa have stepped in, to help those poor communities raise themselves out of poverty by making something out of next to nothing.
If you want to help (and treat yourself!), you can buy bracelets from Life in Africa, like the ones shown above, and other items made from their colourful handmade paper beads. Visit their site to learn more about this company.

Photo by Bead for Life
And there's more! Bead For Life have a lovely site with lots of beautiful photography like the one above and better still, more paper beads jewellery to buy, including packs of loose beads, in their shop.

Photo by Lars Hasselblad Torres
I really liked the fish above which is a 'Peace Tile', made by a participant in The Global Peace Tiles project , which "is a fun way to involve people everywhere in arts-based learning and sharing. To date, more than 3,000 people - from 7 to 70 - in over a dozen countries have produced thousands of works of art that have been combined into vibrant murals. Produced in structured workshops, these tiles have been used in many ways - to respond to urgent issues like HIV/AIDS (advocacy), to explore aspects of community (self-expression), to learn more about a topic like children in conflict (education), to build connections among groups of people (exchange), and to work through trauma (therapy)". There is even a Flickr group where you can see lots of examples of Peace Tiles.


Ten Thousand Villages is a great site for buying fair trade crafts, especially things like the colourful ship kite and the recycled can ornament, above. This company works with communities in the poorest places around the world to help raise their standard of living by selling their handmade crafts. Why buy things from the high street when you can buy beautiful things from the comfort of your home, AND know that you're helping someone in need at the same time, even in a small way - it all counts.
So treat yourself and help someone in poverty at the same time!
Joey x
Etsy Treasury and a Haiku - Still and Quiet Yellow Trees

This is the Etsy treasury I made tonight. Click here to see it in person. And this is my haiku to go with the treasury:
I pass deathly still
golden yellow trees, sallow
leaves clinging to life.
Have you ever tried to write a haiku? If you don't know what it is, it's a poem which expresses a feeling or mood, usually about nature, and should have three lines. The first line should be 5 syllables, the second, 7 syllables and the third line, 5 syllables again.
Here's a quick guide: How To Write a Haiku
Joey x
Monday, 6 October 2008
Raspberry and Chocolate Etsy Treasury
Do you like this treasury? I love these colours together and I was lucky enough to find plenty of great items that go together pretty well. What do you think? Visit the treasury here to take a closer look!

Sunday, 5 October 2008
Sheffield Botanical Gardens in October
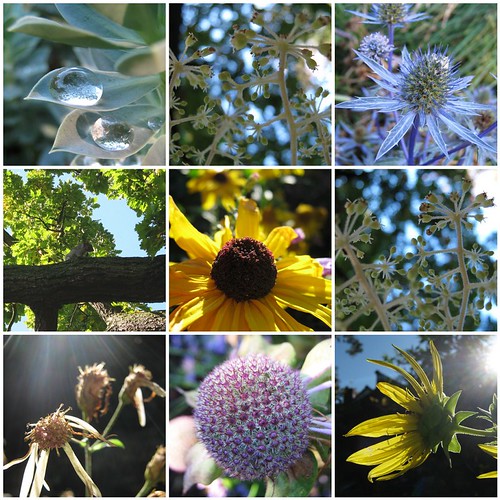
I went for a walk and photography outing in my favourite park, the Botanical Gardens this afternoon.
It was a lovely day after the heavy rain all last night and early this morning. There's nothing like a quiet walk and taking pictures when you feel bitter and twisted inside, like I did today. I'm sure you know the feeling, when you get out of bed on the wrong side and everything and everybody in the whole world is out to get you.
Anyway, I was happily snapping away, taking pictures of flowers and bees and squirrels, when the ground - yes, the ground - got me! I slipped on some very very soggy grass, sodden from last night's rain and went "a over t"!
I think it must have looked very comical at the time but I felt ridiculous, embarrassed and silly. My glasses flew off, I was covered in mud and worst of all, my camera went face down, and the lens is still full of grit and muck even though i've tried to get it all out.
My pride was bruised but nothing else. And I have these lovely pictures and a funny anecdote to tell, so it was a good day I think.
Have a great week, everyone!
Joey x
Tuesday, 30 September 2008
Halloween Etsy Treasury
I've actually been able to do a treasury this morning, which has been fun but I always feel very guilty when i'm doing it (i've so many other things I could be doing!), but never mind!
Click here to see my halloween treasury on Etsy and to visit the shops which are selling these lovely wares!
I couldn't fit everything in, and it's so hard to make a choice... so here are some others that I wanted to include but are 'reserves' in case any in the treasury are sold...
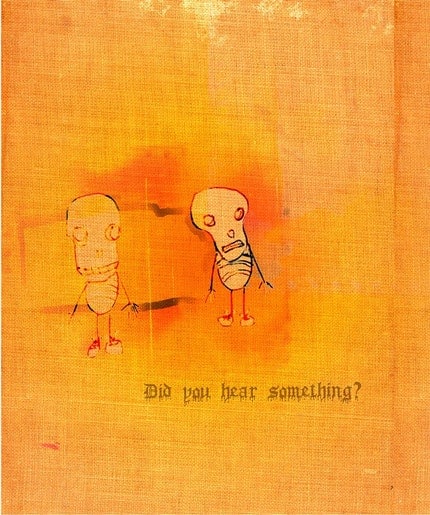
I love this card, so sweet and you could almost warm your hands on the colour! from Smacshop
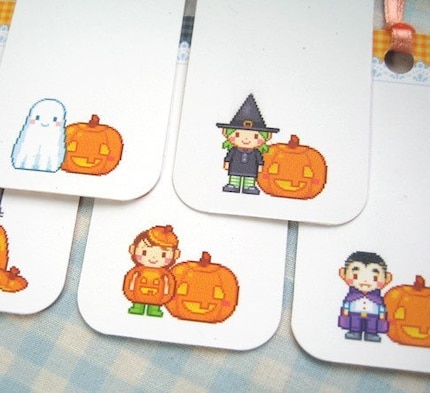
Look at these little cuties! What an adorable way to decorate a present... now I could get used to presents at Halloween if anyone who knows me is reading this... ;-) from Smile Recipe
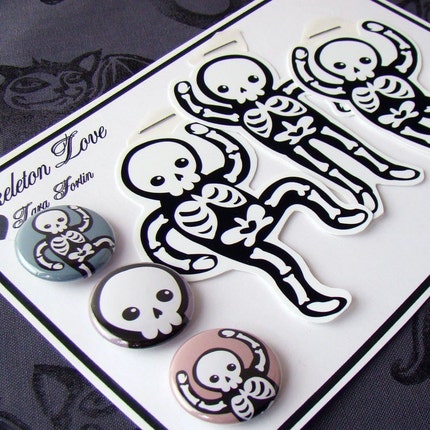
More cuteness! This time from Etsy favourite Black Lily Pie. Badges and stickers... swoon!
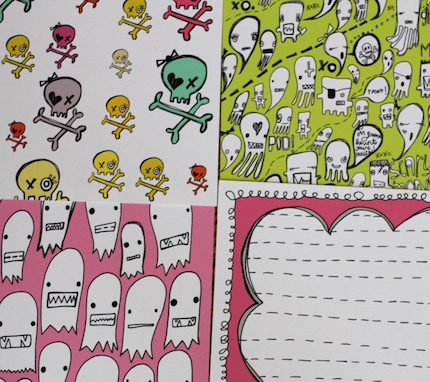
and this is just wonderful! A massive pack of paper fun for kids and kids at heart (like me!), all brilliantly illustrated with spooky characters. From Elsiecake
So you see, halloween can be as cute as you want!
Joey x
Monday, 29 September 2008
Kitties Treasury on Etsy

Oh look! Isn't this a lovely collection of kitty cuteness? And my bag is here! Click the image to be taken to the actual treasury... but hurry! It's only there for another 19 hours!
Joey x
Friday, 26 September 2008
I've Loved You So Long

Juliette (Kristin Scott-Thomas) returns from 15 years in prison and everyone has their own ideas and opinions about her and what she might have done. This film, although very sad, is very watchable, as it shows us what it may be like for people who are the 'black sheep' of their families. It is not an enviable position. Juliette is a vacant space where someone used to be, but it seems that her soul has left her, and all that remains seems to be a dark, lonely void. Her little, but grown-up and successful sister, is the only family to whom Juliette can return to after all the solitary years. However, her sister seems to be the only person at first who can bring herself to give Juliette a warm welcome.
I thought the film was not a little hard-going and emotional as we are shown the sadness, embarrassment, guilt and regret of the two sisters, but this is where the film's interest lies. I found the two sisters and their relationship, completely absorbing. If I wanted to be picky, I would say that the story fits together a little too neatly, which seems to go against the spirit of showing family life for 'real', warts and all, but then this wasn't reality, it was a story about an unbreakable bond between two sisters.
Wednesday, 24 September 2008
Some Favourites from the UK Etsy group
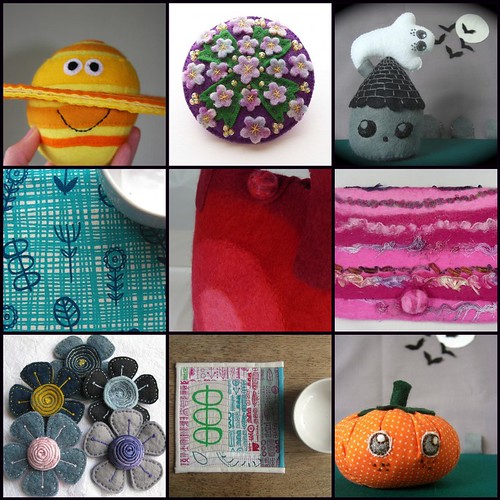
I love Etsy so much I thought I'd share my enthusiasm with you! Here are a few of my favourites from the Etsy UK group on flickr.
1. Who can resist the lovely colours and happy smile of Claire Payne's Smiley Saturn? He's so unusual, I think a Smiley Jupiter is in order (my favourite planet after Earth).
2. Cherry Pip's lilac tartan daisy flower brooch is very pretty, I really like how each little flower is slightly different because of the patterned felt which Nicola has used.
3 and 9. Miss Niff/Stitcher Scribbler's haunted house and sweet pumpkin are wonderfully cute, far too nice for halloween! I really like the attention to detail in these soft sculptures and the neat craftsmanship.
4 and 8. Lusummers/Summersville's beautiful handprinted fabric is fantastic! The blue and turquoise design reminds me of lovely mid-century Swedish fabric patterns and the colours are great! The tiny quilt shows off the designs beautifully and I love the wavy stitching, very neat.
5 and 6. Natasha Smart's decadent handmade felt bags are a delight to look at, and I imagine they're lovely to hold and carry around too! I love the rich, bold colours in these.
7. There are so many felt flower brooches on Etsy, but Kayla Coo's flowers in muted tones are attractively different to the rest, I really like the combination of pastels with the natural greys and pebble-colours.
I hope you're inspired to go and look at these shops on Etsy, and more!
Joey x
Tuesday, 23 September 2008
Revolver - animation by Jonas Odell
Oh look! I have 'embedded' my first YouTube video! Hurrah for Joey!
I first saw this animation a few years ago on Channel 4. There's something about its creepiness and other-worldlyness that I just love. It makes me feel uneasy but curiosity compels me to carry on watching. I really like the clean graphic style of drawing and the strange robot characters, and the unnerving repetitive carousel-inspired music running through the film.
Monday, 22 September 2008
Tressa and Ligeia with Meg at Christmas
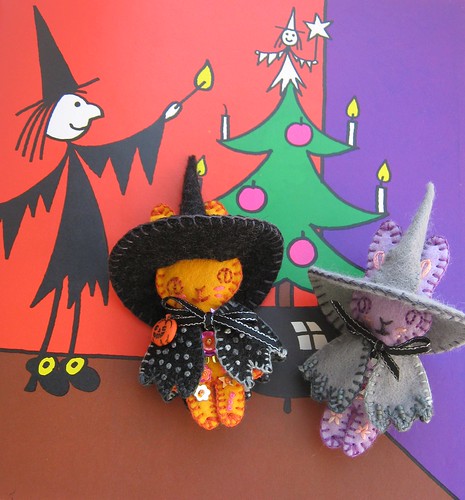
Here are the latest Halloween bunnies. You see them here with Jan Pienkowski's Meg lighting up her "Nightmare Before Christmas" tree... yes, long before Tim Burton thought of it!
Thursday, 11 September 2008
Margaret H and the dark ghost

At last, I've taken pictures of the Halloween brooches I've made so far! I thought I was planning ahead by starting to make them in August but time moves so much faster than me, and so does everyone else!
I've called the one pictured, "Margaret H", can you guess why? ;-)
The background is a page from a lovely children's picture book called "A Book of Ghosts", illustrated by Pam Adams and Ceri Jones. I had another copy of this book as a child, but as it had lovely coloured paper, I cut lots of it out to draw on and make collages etc... Then about two years ago I was amazed to find it at our local cut-price bookshop, The Works in Sheffield, it had been reprinted in 1990. A real classic.
Anyway, back to the bunnies! Their cloaks and hats are removable - yes, dressing-up brooches! I spent a while designing the little 'slots' in the brim of the hat and the cloak at the back so they fit snugly and neatly around the brooch pin when flattened against someone's coat or whatever they've pinned her to.
Well, what do you think? I'll be making some more like these and i'll post pictures of them in my flickr set and in my Etsy shop of course!
Don't have nightmares.... ;-D
Joey x
Thursday, 4 September 2008
Requiem - on BBC 4

I found this to be a very moving but disturbing story. This is the sort of film which, once you start to watch, you cannot turn off because you need to know what happens next. Michaela, who, like the rest of her family, is a very devout Catholic and also has an illness. You immediately warm to this quiet, unassuming but troubled character who struggles to be independent from her parents. The story starts when Michaela moves to University, much to the displeasure of her mother, who is afraid that Michaela’s illness will cause her trouble while she's away from her protection. Michaela however, is certain that her strong religious faith will help her through any difficulties which life throws at her.
It was Michaela herself (played by the wonderful Sandra Hüller) which made this film particularly fascinating to me, if not exactly 'enjoyable'. Her illness is referred to as epilepsy but she is also very mentally disturbed in many ways, and we see her go from polar opposites of happiness to consuming anguish and mental torment. Michaela has a very sweet and calm expression but Hüller contorted it into a hellish gargoyle-face during Michaela's darker moments when her stability crumbles completely. This seemed to provoke a feeling that the 'devil' within her was finally breaking free, and Michaela was consumed by her illness and finally broken apart by the cruel 'exorcism' which she was submitted to. The fact that the film was loosely based on a true story makes it all the more compelling.
A fascinating, sad and memorable story, beautifully made.
Trailer on YouTube: Requiem
Saturday, 23 August 2008
Soft Heart Purse Tutorial

I had a lot of fun making this purse for my friend Jackie, for her birthday. Purple is her favourite colour, and I had this lovely soft purple corduroy in my fabric stash which was ideal to use. This purse/pouch is just the right size for small items of make-up or an MP3 player or any other small items you want to keep together, as it's a bit bigger than you'd usually find for a coin purse. I've used the zip-insertion method I've used here for internal pockets in bags, but not quite like this before. This is also the first time i've made a purse shaped like anything other than a rectangle, so I'm quite pleased with how it turned out, given it was a first attempt. I hope you find these instructions useful and easy enough to follow, to go ahead and make your own. However if you get stuck on anything, just leave a comment and i'll try to help!
It is advisable to read through all these instructions fully before you plan your own project - this way you will know what to expect right at the beginning, and hopefully your sewing will go smoothly.
For a heart purse measuring approx. 12cm high, 15cm wide, you will need:
- paper heart templates and letter(s) printed out and enlarged to desired size. I don't provide the letters here, so open a new Word document (or whatever word processing program you use), type the letter(s) you want and then experiment with different fonts. Alternatively, you can draw your own letter from scratch. Or cut one out from text on a cereal packet or a magazine etc.
- outer fabric (I used cotton corduroy), 2 pieces about 20cm x 16cm
- lining fabric (I used polyester lining fabric), 2 pieces same size as outer fabric
- felt in two colours (I used pink and lilac felt), heart piece 9cm x 8cm, the size of the letter piece will depend on the letter used. You could use woven or other fabric in place of felt if you wish, but bear in mind that these could fray if you don't finish the edges in some way. Should be fine if you edge with ric-rac or ribbon etc as shown in this tutorial.
- Vilene, the iron-on type, either heavyweight or mediumweight (or both), 4 pieces 20cm x 16cm. Note: if you use Vilene, your purse will be more sturdy and will feel more substantial, however if you prefer, you don't need to use it. If you do use it, match the weight of the Vilene to the fabric you're ironing to, because you want the Vilene to give adequate support and strength to the fabric, but not so much that it makes it oddly stiff, and/or cause the fabric to take on an unsightly rippled, 'cockled' appearance. I used heavyweight Vilene for the outer fabric and mediumweight vilene for the polyester lining fabric. If you're not sure which to use, iron a small piece of vilene of a small swatch of fabric to test it.
- Bondaweb, same size as felt applique pieces
- zip, up to 16cm long, but you can use a shorter one. Remember you can shorten a long nylon zip if that's all you've got. Read Lisa Lam's instructions on her Handblog site on how to do this: handblog intructions on shortening a zip
- ric-rac
- cottons in colours to match your fabrics
- embroidery silks/floss for the embroidery on the applique
- sewing machine with normal and zipper feet
- pen, pencil, ruler, and tailor's chalk if not using Vilene
- embroidery needle
- scissors
- pinking shears, if you have them

The Patterns - click on the image below, this will take you to the A4 size picture which you can then print onto A4 paper and it should be the right size. Hopefully... After printing, cut the hearts out around the solid black line.

Step 1: preparing the fabric
You'll need the outer and lining fabrics and Vilene.
Start by drawing around the large heart template onto the non-glossy side of the vilene. If you don't want to use vilene, draw around the template directly onto the wrong side of the fabric with a pencil or tailor's chalk.
Cut around the vilene hearts, leaving a margin of around 1cm all around.
Iron the Vilene hearts to the wrong side of the outer and lining fabrics.
Cut out the heart shapes on the pencil line. You will notice that the Vilene helps to stop the fabric from fraying, as well as giving the fabric a nice weighty feel.


Repeat this for all 4 pieces of fabric...

Step 2: making the zip opening and inserting the zip
First, measure the length of your zip teeth (shown by the blue line under the zip in the picture below - from the end of the zip pull to the metal tack on the other end of the teeth). This is how long the opening for the zip will be.
Place one lining piece and one outer fabric piece right sides together, so that the wrong side of the lining piece is facing up, as in the picture below.
Draw a rectangle on the back of the lining piece as shown in the picture with a blue box. This needs to be the same length as your zip's teeth which you measured before, by about 1cm - it needs to be just a tiny bit wider than your zip.
 As in the picture, draw a line along the middle of the rectangle, ending in two v-shapes. This will be your cutting line. But don't cut anything just yet! Pin the two fabric pieces together along the rectangle as shown. Then stitch on your machine with a straight stitch, on the rectangle you've drawn, unpinning as you go (be careful not to let your machine bash any pins). You should end up with something that looks like this, in the picture below.
Now this is the best bit! You need to cut along the central pencil line, through both layers of fabric. At the ends where the V shapes are, you will need to be ultra-careful not to cut the stitches in the corners! You should end up with a nice long 'slot', as shown in the picture below. Now take the lining fabric and pull it through the slot, all the way so that outer fabric and lining are facing right-sides out. Smooth the lining down, then press it with a medium-hot iron. You will find that it creases a bit at the ends of the slot, so take it steady and carefully press the creases out as much as possible. What you then have is a nicely finished, neat opening to which you'll sew the zip!

Now pin the zip to the back of the slot, so the zipper and teeth can be seen through the slot, as shown in the picture below. Make sure the zip is nicely central in the slot - you may have to spend a little careful time to ensure its lined up properly. Don't rush this, take your time and pin every bit of the zip as shown below.

Then with the zipper foot attached to your machine, place the fabric under the needle, outer fabric facing upwards, and sew around the opening, about 4mm from the edge of the opening and unpinning as you go. You'll be sewing through both layers of fabric and the zip behind, as shown below (actually I cheated with this picture a bit, I'd forgotten to take the photo so here you see the zip already sewn in).
 You've now completed the 'back' of the purse.
Step 3: sewing the lining pieces together
Place the back piece with the zip, lining face-up. Then place the other lining piece on top, right-side down. Pin just the two lining pieces together, around the top of the heart but not the bottom. This is so that you can turn the purse right-sides out later on.

Then sew the lining pieces together with a 1 cm seam allowance, unpinning as you go. It's a good idea, I found, to use your zipper foot to do this, because there's very little space near the ends of the zip opening to maneouvre the foot around. Look at the picture below for an idea of how I did it. It was tricky, so I had to take my time.

Step 4: applying and embellishing the applique
Trace the small heart shape onto the Bondaweb with a pencil, and cut out, leaving a small margin around the shape. Then iron the Bondaweb shape onto the felt for the applique and cut out along the pencil line. Then peel the paper backing off, place the applique Bondaweb side-down onto right side of the other outer fabric heart, (carefully position it to where you want it to be because there's no going back once you've ironed it!) and iron on (following instructions on the Bondaweb packet). Repeat this for the letter you've chosen. Remember to trace your letter onto the Bondaweb in reverse if applicable, otherwise your letter will turn out back-to-front! You should end up with something like the picture below.

Now, it's time to embellish your applique in whatever way you choose. I decided to sew ric-rac around the edge of the heart, so I carefully pinned the ric-rac around the edge then slowly sewed on with my machine. You could hand-sew the ric-rac on if you wished.

I also chose to use a variety of embroidery stitches to decorate the heart; daisy chain-stitch flowers; french knots on and around the letter J and for the flower centres; and backstitch very close to the edge of the letter to emphasise it's shape.

This is what the finished embroidery looked like:

Step 5: sewing the outer pieces together
With the wrong sides of the outer pieces facing out, pin all round the edge. Then with a normal straight stitch and a zipper foot attached, sew the two outer pieces together, carefully avoiding catching the lining fabric. This is where the zipper foot comes in handy, because at some sections, you won't have a lot of room to maneouvre. When you've sewn all round, use the pinking shears to clip the seams to reduce bulk, being careful to not cut any stitches! If you don't have pinking shears, just use your usual scissors, it doesn't matter, but I find that pinking shears remove a bit more fabric and therefore you get a flatter seam. And I find its quicker than cutting V-shaped notches all round.

Step 6: sewing up the gap in the lining
Turn the purse right-sides out, so that you have the lining sticking out of the zipped opening. Now carefully pin the gap in the lining, turning the edge in so that you have a seam allowance of about 1 cm. Then sew the gap up, unpinning as you go.

Your sewn-up lining should look something like this, but i'm sure yours will be a lot neater! I'm not setting a great example here, am I? But anyway, it was securely sewn-up ...

Tuck the lining back into the purse, give it all a quick press if it needs it, and there you have it! below you can see inside the purse, you see there's plenty of room for all sorts of bits and bobs in there!


I hope you've had fun in making this purse! If you do make one, i'd be really keen to see it, so please leave a comment if you have.
Cheers for reading!
Joey x
Thursday, 21 August 2008
Blog Action Day for Poverty - 15 October 2008

I will be taking part in the Blog Action Day on 15 October 2008, which aims to draw attention to people who live in poverty around the world. I'm not sure yet exactly what my post will say, but i've got plenty of time to think about and plan it! If you want to help raise awareness of poverty, click the link at the bottom of this post to go to the Blog Action site and register your intention to join in.
I feel a line of charity brooches coming up... The 25 "kitty pips" brooches you see above were made and sold in aid of the Children In Need annual appeal, and I raised £100! Which I was quite pleased about. :-)
Please check back on 15 October for the post! :D
Wednesday, 20 August 2008
Bunny Card for a Birthday Girl
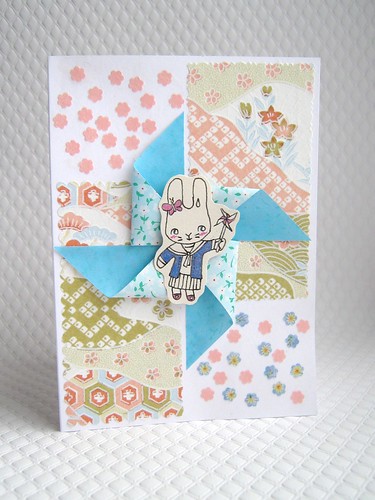
Chloe's Bunny Card, originally uploaded by Joey 7.
I made this card the other day for my niece Chloe, who is 12 today! :D Happy Birthday Chloe!
I used the same bunny design from one of my painted brooches, then thought, "ooh! why don't I put a real paper windmill on the card too?!" Its surprisingly easy to make a paper windmill, but quite effective I think...
Starting with a square of paper, cut 4 straight slits going from each of the corners of the square, nearly to the centre, but not quite - you need to stop cutting each slit about 1cm before you reach the centre. Then starting one of the corners, bring it down to the centre of the square and hold it there, then repeat on corresponding corners of the other three sides.
You can secure the four corners with a drawing-pin if you want it to spin, or one of those cute metal paper-fasteners/'brads' with the little arms you fold out at the back if you're not bothered about it spinning. This is what I used, then stuck the bunny drawing on with a sticky foam pad, and covered the 'arms' at the back with a piece of patterned paper.
Here's a easy-to-understand tutorial for the windmill, with clear diagrams: Make a Windmill
Look at the fantastic range of paper-fasteners/brads you can get from sellers on Etsy:
The sellers are (top row, from left) party brads: CardBlanc, hearts: Cornerstore, fabric-covered brads: Aimoobaroo, shades of brown: BloomingFelt, (second row) snowflakes: Susan's Scrapbook Shack, canvas-covered brads: CardBlanc, screws brads: Susan's Scrapbook Shack, red apples: Susan's Scrapbook Shack, (third row) dragonflies: Susan's Scrapbook Shack, alphabet fabric brads: Cornerstore, trick-or-treat brads: Scrapbooker's Hideaway, moose brads: Susan's Scrapbook Shack, (bottom row) oak leaves: Susan's Scrapbook Shack, handmade Sculpey brads: Doridoo, patterned orange shades brads: Brittany's Photography, Scrapbook Art and Supplies, jeans buttons brads: CardBlanc.
If you are inspired to make a card like mine, I'd love to know and see a photo, so please get in touch!
thanks for reading! :D
Joey x
Subscribe to:
Posts (Atom)