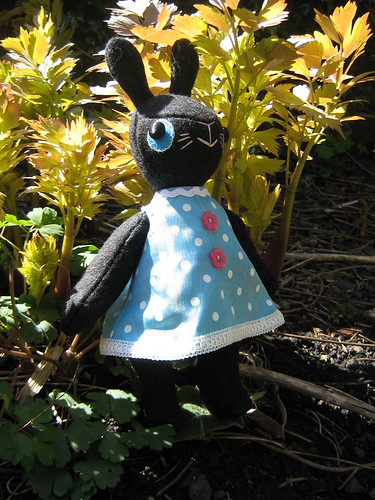
As it was a few years since I'd made my first bunny I thought i'd make things simple by using the tried-and-tested pattern (for the body, at least) first.
However, I did design a brand-new head pattern for this bunny though which took a lot of trial and error. I started by modelling a plasticine head, then divided it into sections by lightly scoring lines which would be the seams.
I then laid tracing paper onto the head and traced the scored lines, then cut the paper sections out; these were the basis for the pattern.
I then made a series of felt heads until I achieved the shape I wanted. This tried my patience a lot and wasn't easy! But eventually Berlita's head took on the form which I was looking for.
This was the hard work over. Now I had a pattern for the body and head that I could follow, so the rest was relatively plain sailing. I used some very nice black wool felt coat fabric, which was easy to work with as it doesn't fray - a real benefit when you're working with small fiddly bits!
Although I did use Vilene iron-on heavyweight interfacing on all the pieces to give it that bit more stability.
I covered a couple of buttons with black satin for her eyes, which are ok although they do protrude a little more than i'd like.
I also invested in some new needles - some extra long upholstery ones for attaching the arms and legs, and some curved ones for attaching the head - useful for getting the needle into such a tight corner (although the curved needles I got were a little thick for the felt I was using, but would be fine on woven material I think).

I embroidered Berlita's features before I stuffed her face, and I also planned and wrote down what order I would sew the pieces, because this is the area I always tend to mess up! Like sewing up a seam that I was meant to leave open... my seam ripper is very well-used, unfortunately!
I designed the pattern for her little dress and made it up in a blue and white polka-dot polyester satin moire that i've had for years, and which I only use for very special occasions because one day it'll be gone!
Berlita Bunny isn't going anywhere- I spent too long making her to want to give her up - but I may make her some cousins who will be up for adoption (hahaha! I mean up for sale in my Etsy shop....) when I can get around to making them!
Please tell me what you think to Berlita!


I think Berlita looks great, Joey!
ReplyDeleteThe process you went through to make her head is very interesting.
So nice to see how your your creative process is done! Thanks for sharing.
i love berlita! it's always great to see how people approach a new project!
ReplyDeleteNew post ever?
ReplyDeleteI always check....but nothing!
When will you post again?
ReplyDeleteI keep checking but nada!
give us more Joey!
thank you everyone! I really appreciate that you enjoyed reading about Belita!
ReplyDeleteOh and Sarah - Thank you! I'm so glad to know that you enjoy reading my blog! I have just been on holiday and i'm planning to write about what I did... In due course!
Take care!
Joey xxx
Excellent way of 3D-ing a paper pattern, that's the first rabbit mannequin I've ever seen!
ReplyDeleteCAN U PRINT THE PAGE OUT
ReplyDeleteCAN U PRINT THIS
ReplyDeleteUltimate Blogger: I've never tried but I'm sure you'll be able to print these pages, just like you can print any web page. Good luck!
ReplyDelete